

Convento dos Capuchos da Caparica: from HBIM to FFF (3D printing)
In the summer of 2019, a first HBIM of the Conveno dos Capuchos, in Caparica (near Lisbon, located in the south margin of Tejo River, Almada municipality, Setúbal district), was developed based on automatic 3D non-contact surveys (laser scanning and photogrammetry). This model encompassed the facade, the entrance hall and the high choir. In this sequence, we decided to test processes leading from the digital model to a physical scale model. The physical model should maintain the formal expression of the old cenobium. How can physical models be understood as scientifically valid references? This is a question that we are interested in exploring. The transition from a digital BIM model to a physical model, printed in 3D, according to the current 3D printing process, called FFF (Fused Filament Fabrication), was a challenge.
The first issue was to decide the model’s printing scale. The decorative elements surrounding the niche with the image of Santo António constitute the most detailed detail of the convent’s façade and, therefore, difficult to reproduce in a scale model. The niche printing tests carried out led to the definition of the model’s scale (1:40 approximately).

HBIM model: decorative details of the niche of the image of Saint António.
Print test to determine the scale of the physical model to be printed in 3D.
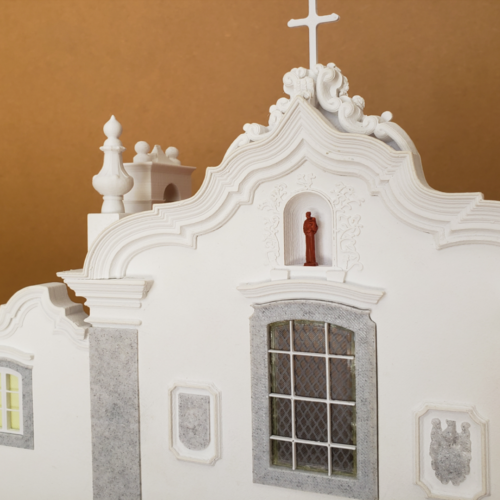
Details of the crowning of the facade (final physical model).
The next fundamental step was to subdivide the digital model. The partition logic followed three criteria: 1) to divide as few parts as possible; 2) depending on the available print volume (circa 210 x 210 x 300 mm); and 3) minimizing supports. The process of dividing the model evolved throughout the process in various tests. Initially, the model was split into 21 pieces. This number gradually increased with the need to introduce greater differentiation in materials, colours and textures. This was the case, for example, of the walls and window openings with their stone moldings and, later, with the differentiation of frames and glass.
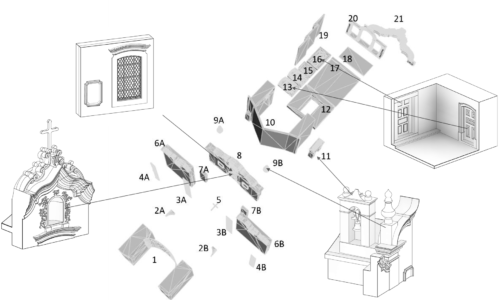
HBIM model. Initial division into 21 pieces for 3D printing.
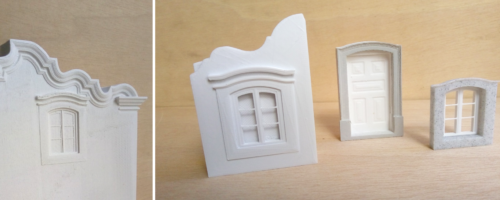
Physical model. Initially, cornices, walls, windows and moldings were cast in a single piece. The experimentation process led to a gradual autonomisation of the various elements.
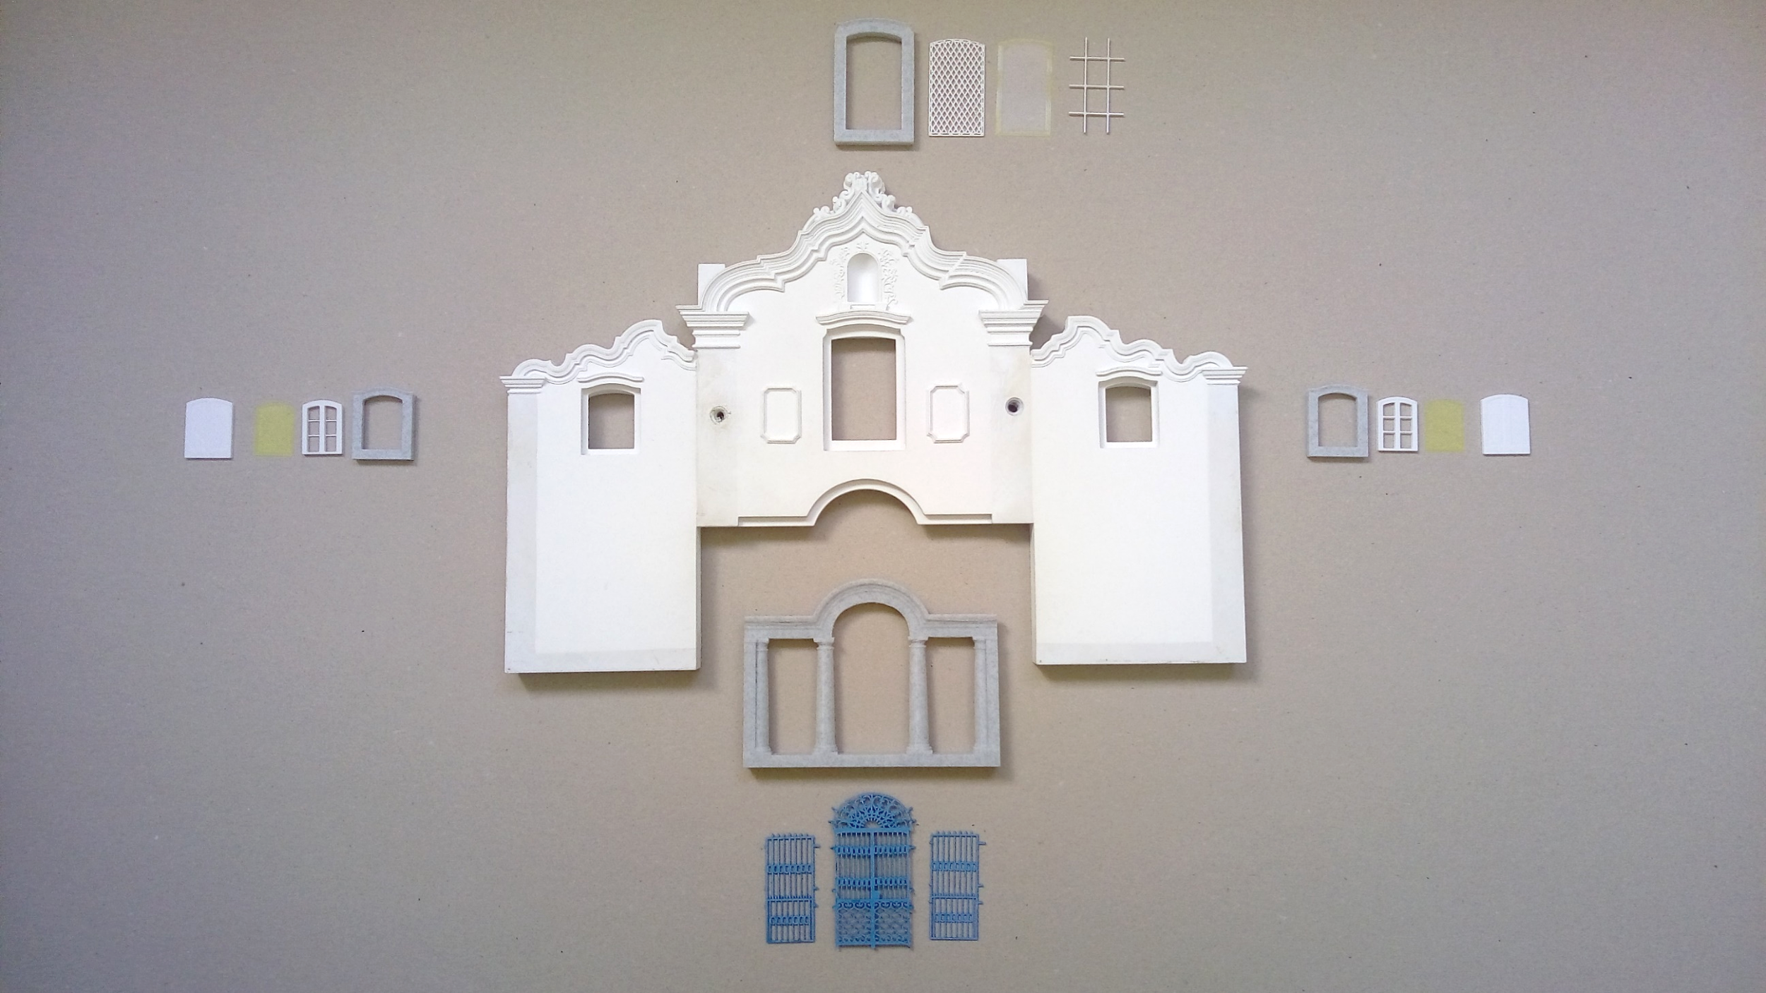
Facade: constituent elements.
The atrium, and its tiled coating walls, was a very specific case. Initially reduced to its most elementary geometry, we subsequently decided to test the possibility of reproducing, in 3D printing, the blue and white tile covering, so characteristic of the convent’s entrance hall. Within the BIM-to-FFF workflow, tile coating followed a specific workflow outside of BIM using Adobe Photoshop to abstract the pattern, Illustrator to create vector outlines and finally Rhinoceros 3D to extrude the geometry for 3D printing.
Tile panels are defined by patterns (side panels) and scenes (front panel). The first challenge was how to translate both to the scale of the model, so that they would be recognized and refer the model user to the original ones. Thus, it was necessary to proceed with a careful simplification of the designs, while maintaining their identity. On the other hand, and in addition, it was necessary that the printable versions were viable for the double extruder printer (equipped with current 0.4 mm nozzles) – the printing would have to be bicolour. Colour was another challenge. The designs are defined in cobalt blue tones on a white background. The use of a colour very close to the real one proved to be too visually imposing. It was necessary to test several tones of blue, trying to identify which one is the most appropriate, in order, also, in the case of colour, to carry out a representation “to scale”. This was a purely visual and intuitive exercise.
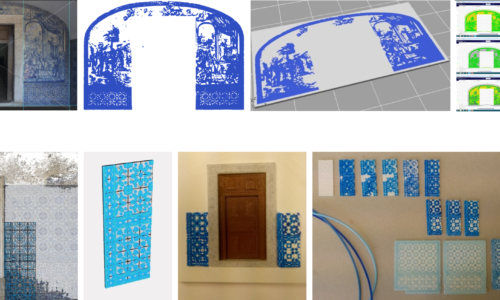
Entrance hall tile panels: workflow from digital models to 3D printing.
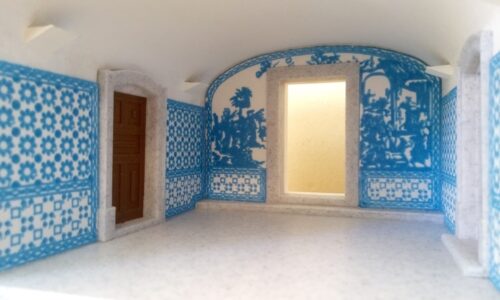
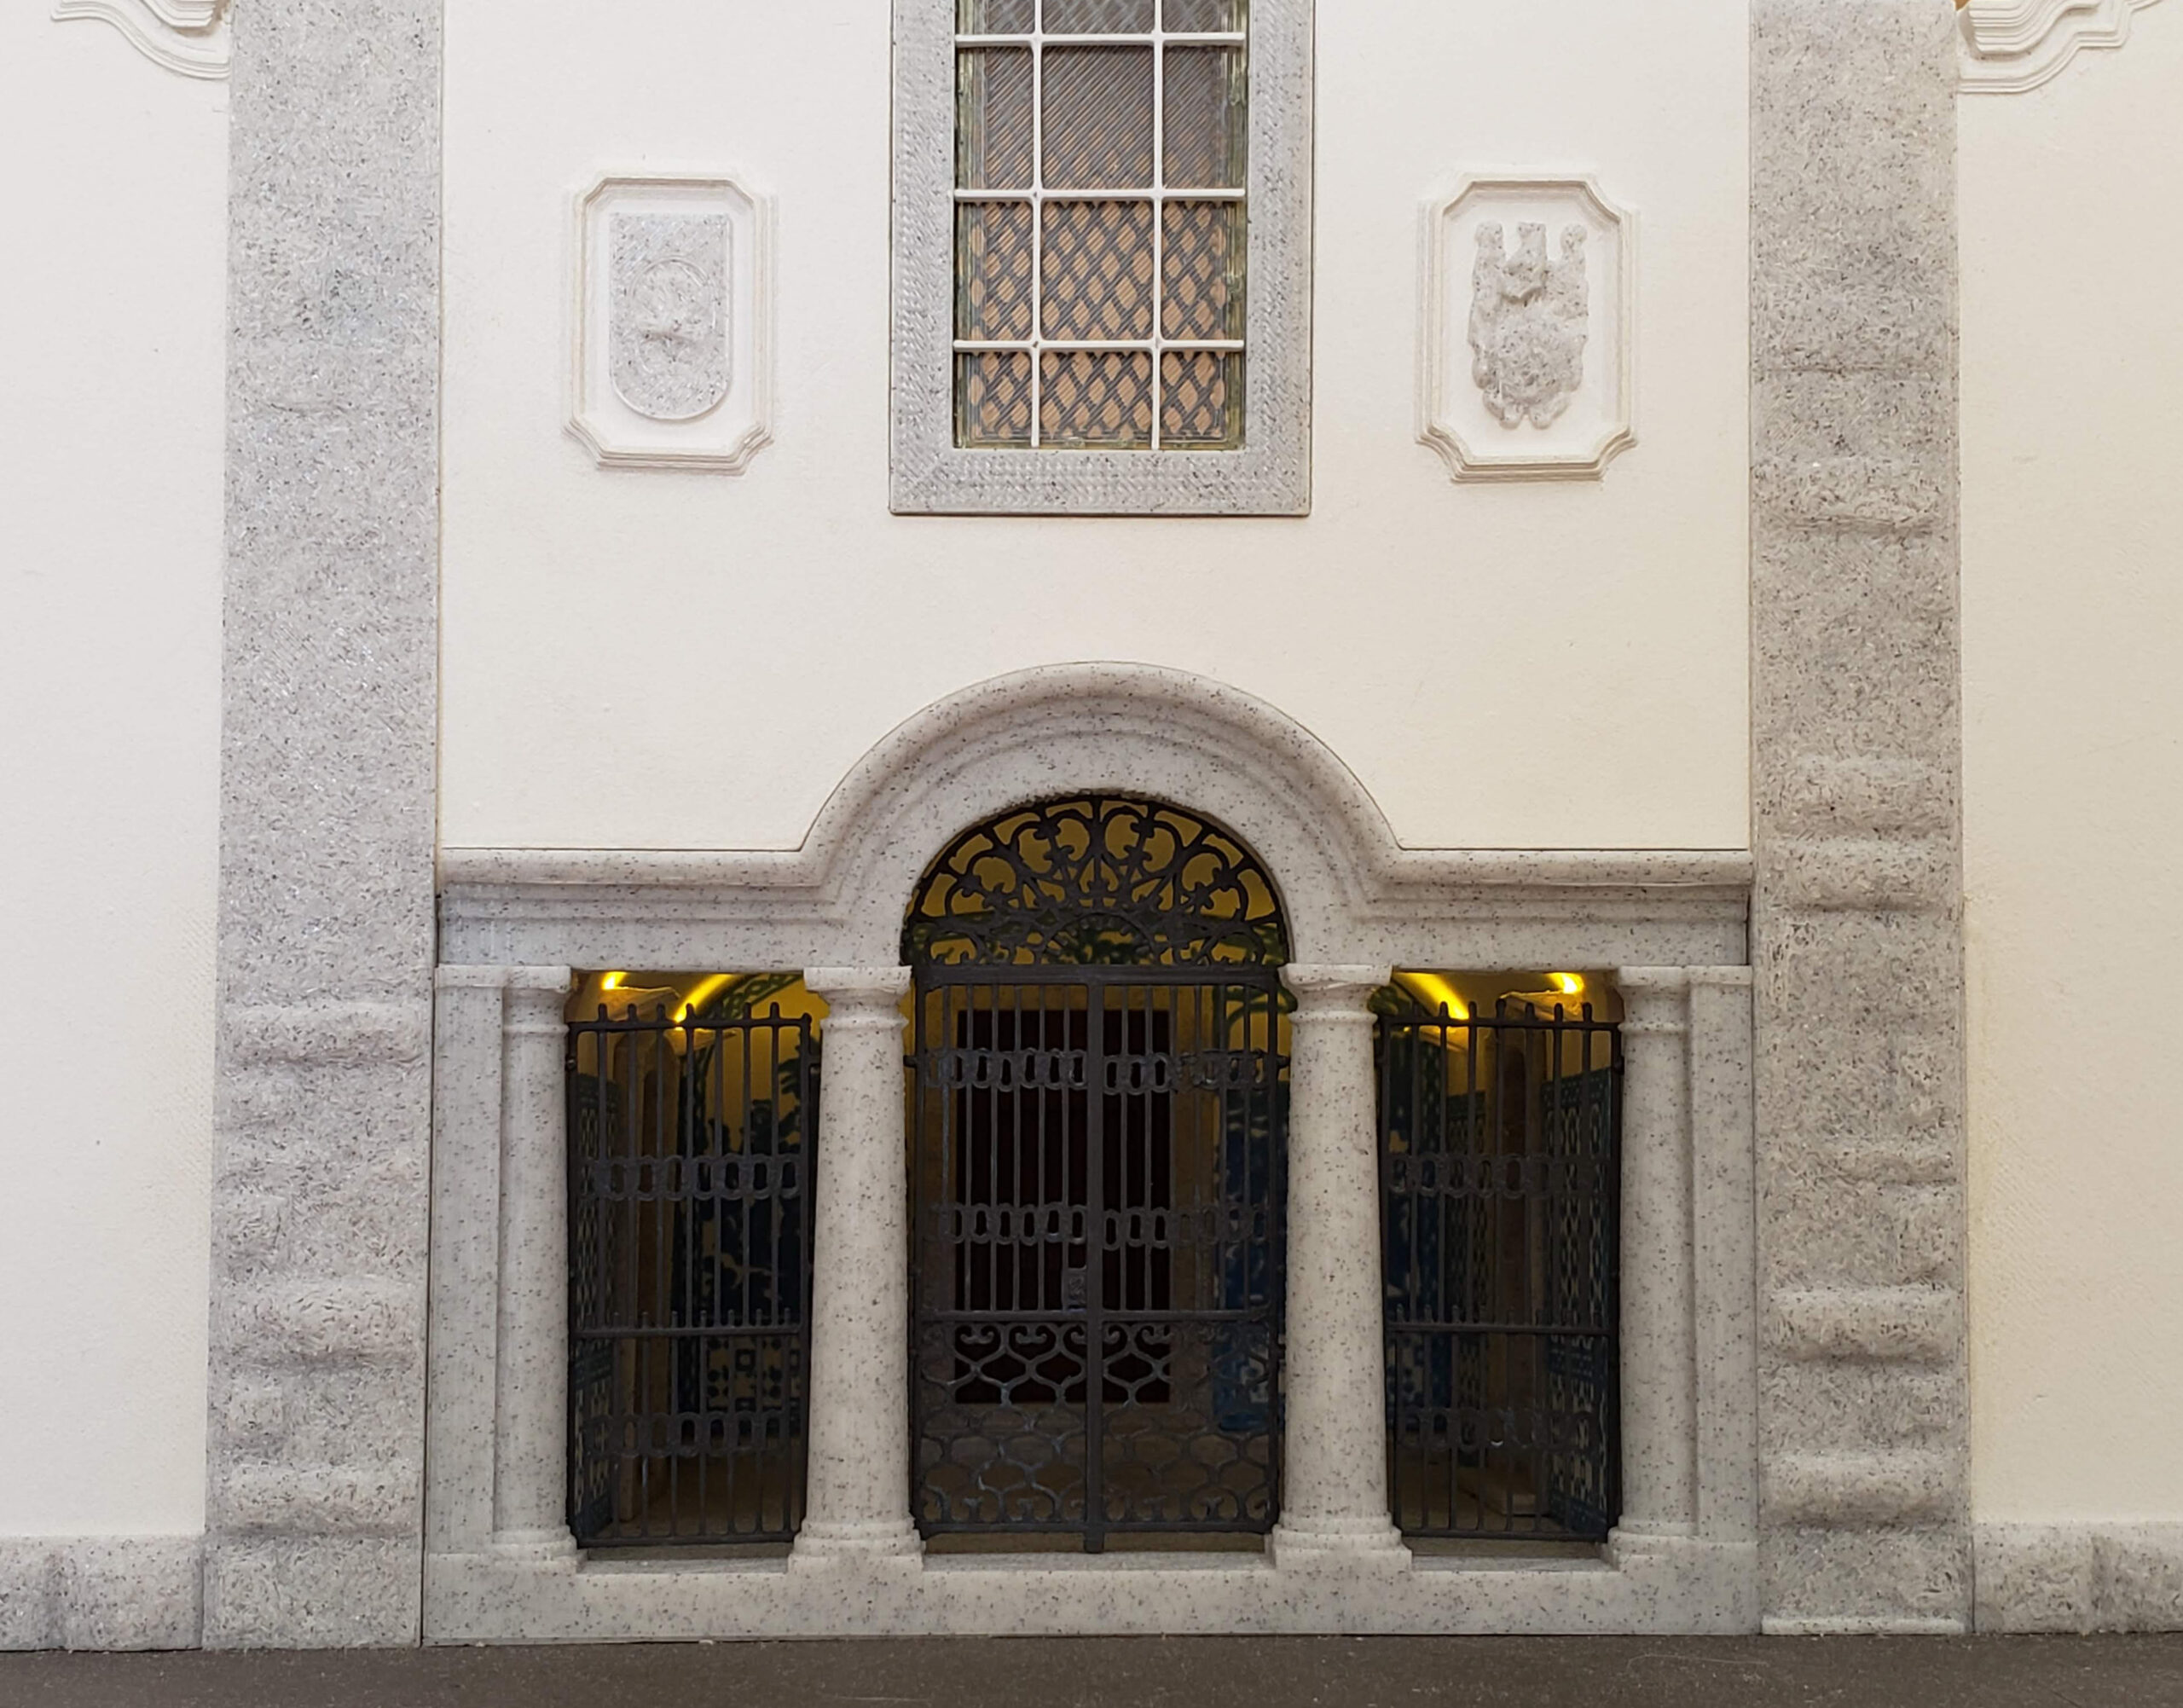
Physical model. The entrance hall and its tiled coating walls.
In this sequence, other elements of the atrium were also more detailed. In addition to distinguishing the (wooden) doors and their (stone) frames through the use of PLA (Polylactic acid) filaments of the appropriate colour, lamps and, of course, lighting were introduced. This became an inevitability from the moment the tile panels were defined. The atrium is gloomy – and as it happens in reality – the tiles are only read, during the day, when the user is very close to the gates and, at night, with the existent artificial light, yellowish and dull.
Thus, an LED lighting system was created, and the physical model perforated for the passage of electrical wires. A box was also added to accommodate switches and batteries – all situations not foreseeing. The solutions resulted from a continuous process of experimentation and adaptation. The 3D printing of the tile panels gave the physical model an interior that deserved to be “revealed”.
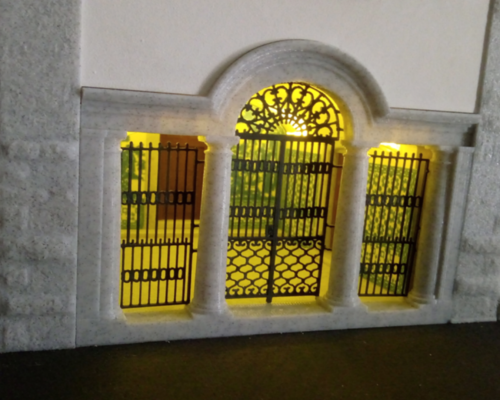
The addition or subtraction of detail was another issue addressed on a case-by-case basis. In the case of the wrought iron gates in the entrance hall (another important component of the facade) it was necessary to simplify and even slightly alter their geometry. The profiles are very slender and, at the scale of the model, its printing proved to be unfeasible. It was necessary, not only to eliminate decorative details, but also to change the dimensions of the profiles along the Z axis (the gates were printed lying on the printing platform) so that, without visually altering the reading of the gates, it was possible to print them to the scale.
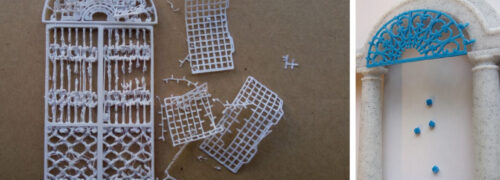
The 3D printing of the facade gates, in its initial version, did not show satisfactory results (left). Final version after review of the digital models of the constituent elements of the gates (right).
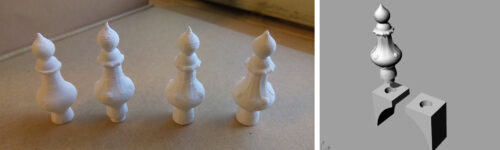
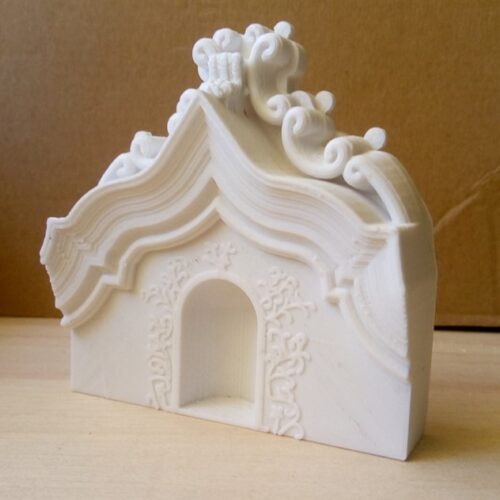
Evolution of the pinnacles (3D printed models) that crown the façade from the initial, simpler version to the final version, with more decorative details (left). Final digital model of the pinnacles and their bases (right).
In the opposite direction, we can point out the case of the pinnacles that crown the facade. Initially defined with a more simplified geometry, we found that it was not only feasible to introduce decorative details, but also that it was desirable – these helped to improve the expression of the set.
Eroded by time, the pilasters and stone baseboards on the facade, as well as the coats of arms (from the Távoras and the Franciscans), were not modelled; before, face meshes were created from the point clouds of these elements. Only in this way was it possible to ensure realistic textures, so important for the final expression of the model.
Facade: pilasters, baseboards and coats of arms. Realistic textures – face mesh models created from point clouds.
Another topic was the case of the texture of the walls. The surface finish, directly resulting from 3D printing, turned out to be inadequate: the machine path, during the printing process, heavily marked the flat and extensive surfaces of the walls. Therefore, it was necessary to plaster these surfaces with suitable products, barring, sanding and finish them with water-based paint (matt white) specific for painting walls. This finish, much more realistic, was fundamental for the final expression of the model. This procedure was only feasible following the greater differentiation of the pieces. For example, the initial fusion of frames, openings and walls would have made this process very difficult.

Facade (3D printed physical model). Matt satin finish on the walls obtained by barring, sanding and spray painting machine (with water paint) of the surfaces. Outdoor drying.
Choosing the right colour was complementary to the proper definition of textures. In most cases, colour differentiation was achieved by 3D printing, using PLA filament with the appropriate colour pigment – this was the case with pilasters, baseboards and roof, for example. We always tried to use coloured PLA and not a composite material (PLA with the addition of other materials) in order to facilitate the printing process. However, in certain cases, it was decided to create the colour (using acrylic paints) and paint the elements of the model, when a very specific colour was needed and was not easy to obtain filament of that precise colour. This was the case with the gates, the copper bell (stained by time), the red tiled floor and the high choir guard, and also the image of Santo António. This process had a painting specialist* (Beaux Arts).
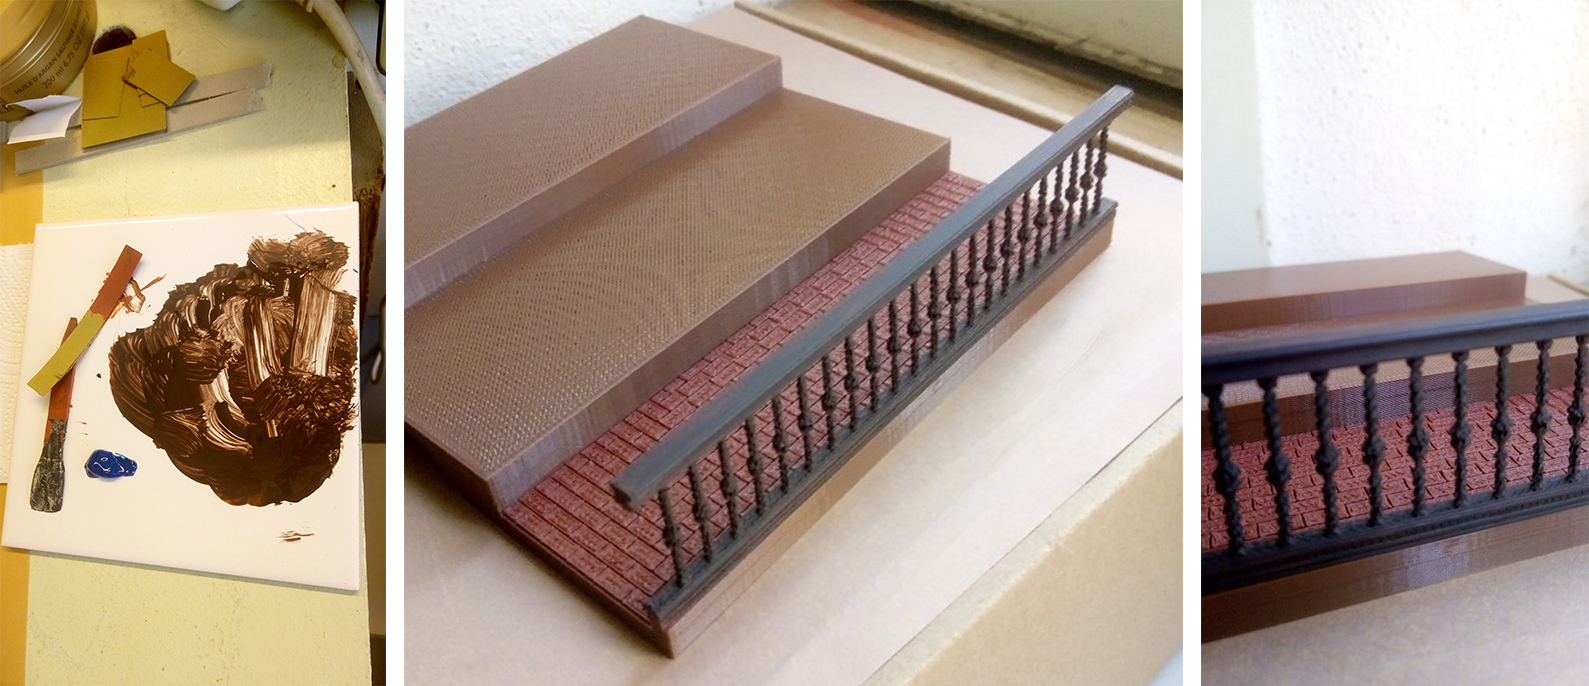
Floors and guard of the high choir. The colours of the guard (dark and varnished wood) and of the floor (lower level) were obtained by mixing acrylic paints and applying them by painting. On the other levels of the floor (wooden floor) a brown coloured PLA filament was used in the 3D printing process.
The subdivision of the model motivated the definition of gaps between the pieces, facilitating their fittings. The gaps, influenced by the shrinkage/dilation of the thermoplastic filament used (PLA) and the geometry of the parts, were tested.
Assembling the model, aiming to obtain a solid and resistant final assembly, was a lengthy process that required adaptations and the creation of auxiliary devices. It was necessary to create holes in the main parts (three walls of the façade, choir and atrium) to reinforce their connection with metal dowels. It was also necessary to ensure that the pieces were glued in their correct position. In this case, fixation devices were used that allowed to keep the pieces in the right position for the time necessary for gluing, taking care to use adequate pressure, without forcing or deforming the pieces. These procedures motivated the revision of the model and, in a second edition, to define holes for dowels.
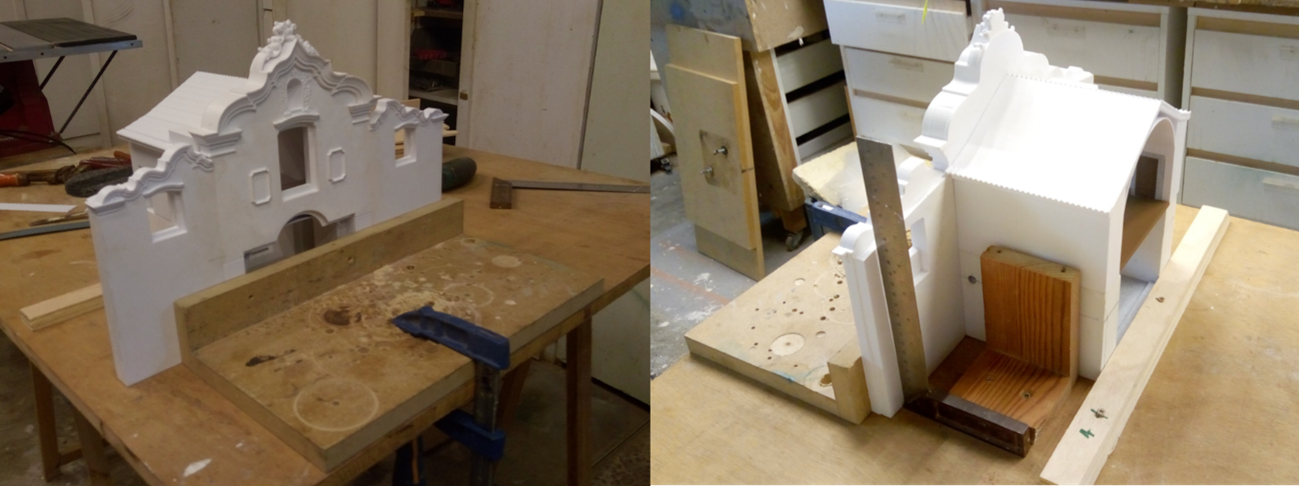
Connection process of the component parts of the physical model (fixing and gluing).
The assembly phase was followed by the finishing phase (already discussed). The smoothing, sanding and spray painting operations were carried out in order to guarantee a continuous and realistic surface finish.
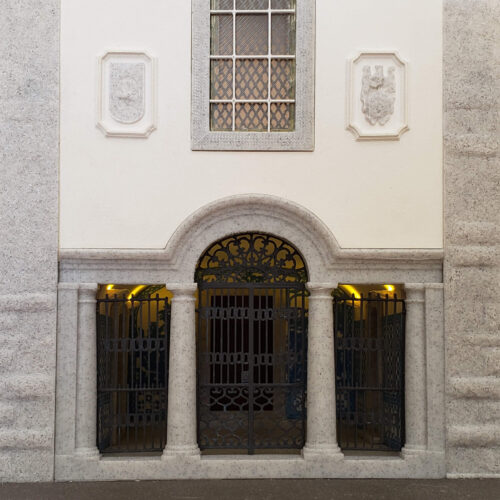
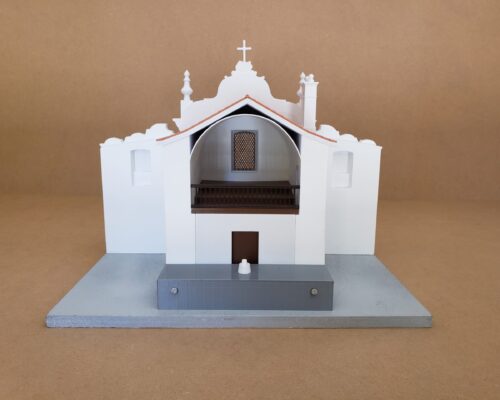
At the conclusion of this process, the physical model revealed the capacity for its user to interpret and experience the atmosphere of the convent. The view of the facade from a distance, the approach to the entrance, the “peeking” through the gates, the “revelation” of the atrium, the shadow of the high choir, constitute moments of discovery, capable of transforming the model into a sensory narrative of the real space.
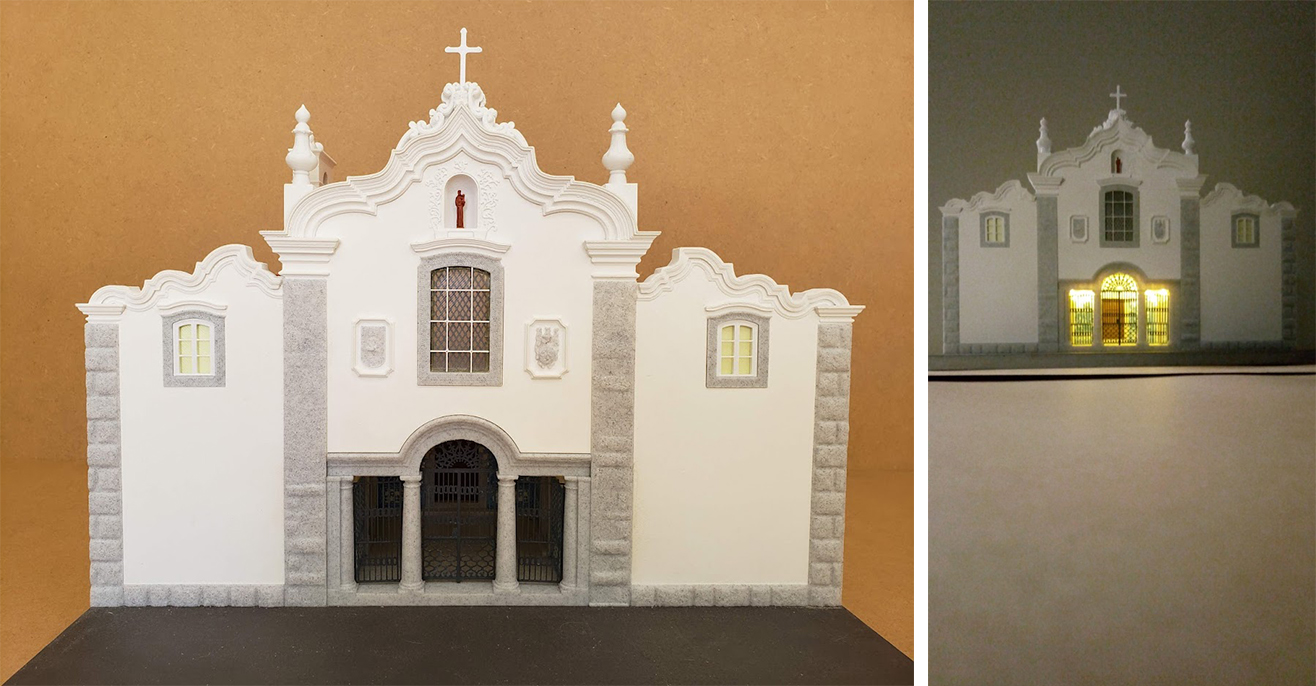
The facade of the convent as it is usually visualized (left). At night, when the artificial light of the atrium is turned on allowing you to glimpse the interior.
At night, artificial light reveals the entrance hall.
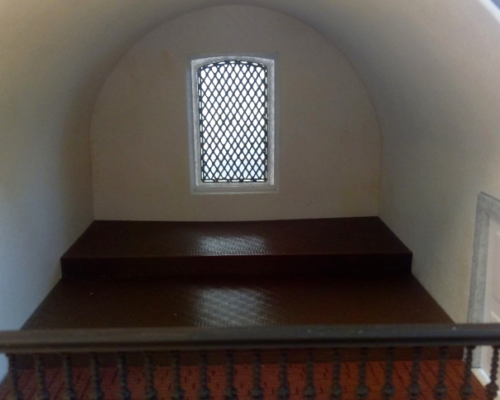
The dim light of the high choir. Light filtered by the stained glass.
Entrance hall LED lighting system box.
Acknowledgements to:
Maria Deolinda Dine de Oliveira Rosado, professor and painter
Carlos Sardinha, professor and architect
António Santos, geographical engineer (Global Geosystems)